
VMware Carbon Black Cloud Apps for ServiceNow Installation Guide
Introduction
ServiceNow is a platform that provides workflow automation for a variety of operational and management use cases primarily targeting IT and security teams.
Integrating telemetry and response actions from the Carbon Black Cloud into ServiceNow streamlines security processes by providing built-in endpoint context and response actions within a single pane of glass. With full incident management capabilities and long term record keeping, security teams leveraging the Carbon Black Cloud Apps for ServiceNow can streamline coordination within the SOC during incidents and reduce friction within their team.
Features:
Automated Ticket Creation and Lifecycle Management
Ingest and manage Carbon Black Cloud alerts within ServiceNow
-
Automatically ingest CBC alerts and other inputs into ServiceNow
-
Populate ServiceNow tickets with data from Carbon Black Cloud
-
Sync updates across both consoles when tasks are changed or completed
Automate incident response actions within ServiceNow
Leverage built-in response actions to orchestrate endpoint remediation from within ServiceNow
-
Perform core response actions, including quarantine endpoint, ban hash, get processes, kill process, from within ServiceNow
-
Pivot directly into the CBC console for deeper investigations
What is coming in this release?
Depending on what features you have with ServiceNow, Carbon Black offers two main Integration apps:
ITSM App: When an alert occurs in Carbon Black Cloud, create a ticket in ServiceNow. The VMware Carbon Black Cloud integration with the ServiceNow IT service management (ITSM) module provides endpoint device context and metadata within tickets to streamline IT workflows and reduce manual data collection.
SecOps App: When an alert occurs in Carbon Black Cloud, create an incident in ServiceNow. The VMware Carbon Black Cloud integration with the ServiceNow SecOps module provides access to additional endpoint response actions, threat intelligence and metadata to contextualize and accelerate security investigations.
Both apps have a reliance on the Base App, which is used to integrate Carbon Black Cloud with ServiceNow and integrate relevant endpoint alerts and context directly into ServiceNow ticketing and incident workflows. The Base app is automatically installed when installing the ITSM app or SecOps app.
The steps for installation and configuration are sequential and build upon one another, so make sure that you complete each step before going to the next step.
Prerequisites
Before you can perform the steps in this exercise, you must be a customer of the following products and have met all prerequisites mentioned.
-
VMware Carbon Black Cloud Instance (CBC)
-
VMware Carbon Black Cloud or VMware Carbon Black Cloud of Security Operations App – available in the ServiceNow Store
-
ServiceNow with ITSM and/or SecOps Module
-
Supported ServiceNow Versions: Quebec or Rome
-
-
1st-Party (ServiceNow-Developed) ServiceNow plugins on the instance:
-
Domain Support - Domain Extensions Installer Plugin
-
Security Incident Response *
-
Threat Intelligence Plugin *
-
* Only required if using SecOps Module.
Audience
This tutorial is intended for IT administrators and product evaluators who are familiar with VMware Carbon Black Cloud and ServiceNow’s ITSM and Security Operations products.
VMware Carbon Black Cloud Configuration
API Creation
Within the CBC portal, create an API key with a custom role. This key is then used for the integration.
To create the CBC API Key in CBC, go to Settings > API Access > Access Levels > Add Access Level.
- Create a custom access level with the permissions below:
|
Category |
Permission Name |
Permission |
|
Alerts |
General Information |
org.alerts (READ) |
|
Alerts |
Dismiss |
org.alerts.dismiss (EXECUTE) |
|
Application |
Reputation |
org.reputations (CREATE) |
|
Custom Detection |
Feed |
org.feeds (CREATE, UPDATE) |
|
Device |
Quarantine |
device.quaratine (EXECUTE) |
|
Device |
General Information |
device (READ) |
|
Device |
Policy Assignment |
device.policy (UPDATE) |
|
Live Response |
Live Response Session |
org.liveresponse.session (CREATE, READ, UPDATE, DELETE) |
|
Live Response |
Live Response File |
org.liveresponse.file (READ, DELETE) |
|
Live Response |
Live Response Process |
org.liveresponse.process (READ, DELETE) |
|
Search |
Events |
org.search.events (CREATE, READ) |
|
Unified Binary Store |
SHA-256 |
ubs.org.sha256 (READ) |
- Create the CBC API Key and assign the access level created in the previous step. In CBC go to Settings > API Access > API Keys > Add API Key
Keep track of the following values from the CBC Console / Documentation:
- Base URL - (Documented for each region)
- Org Key - (CBC Console)
- API ID - (CBC Console)
- API Secret - (CBC Console)
Please note, If you are using Carbon Black Cloud with the Cloud Services Platform, create a Custom Role with the permissions above and assign them to an OAuth App. Use the OAuth App Id and App Secret in place of API ID and API Secret respectively. See OAuth Access on the Developer Network for more information:
https://developer.carbonblack.com/reference/carbon-black-cloud/authentication/o-auth-access/
ServiceNOW Configuration
User Role Creation
To leverage the integration capabilities you are required to define a custom ServiceNOW user role.
Follow the table below to define the necessary role:
|
Users (Main Role) |
Additional Roles |
|
System administrator |
NA |
|
VMware CBC Admin (x_vmw_cb_connector.admin) Note: VMware CBC Admin role implicitly contains VMware CBC Analyst role |
|
|
VMware CBC Analyst (x_vmw_cb_connector.analyst) |
|
* For SecOps App only
** For ITSM App only
Create a new users
- Navigate to Organization > Users, click New
- Fill in the users details and click save

Add Role to newly create user
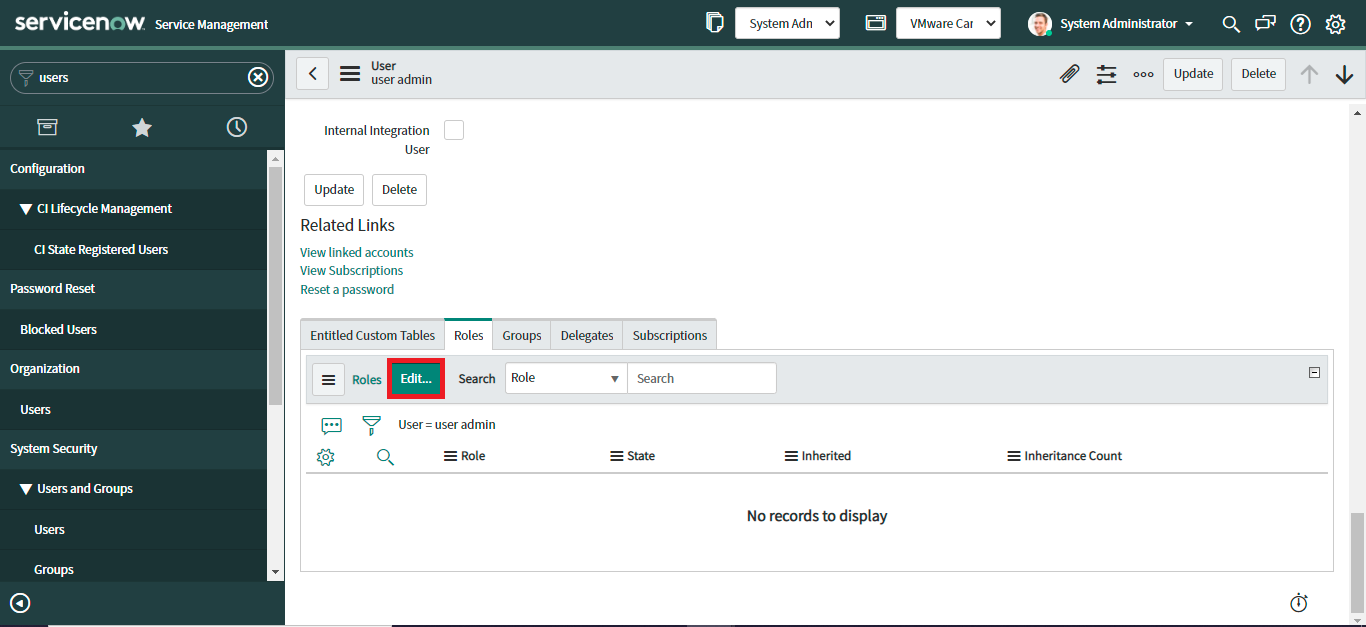
- Navigate to newly created User (VMware CBC Admin) and add main role (x_vmw_cb_connector.admin). Go to Organization > Users, select VMware CBC Admin.
- Once the record is open, scroll down and go to the Roles section, and click “Edit”.
- Add main role (x_vmw_cb_connector.admin), by moving relevant collection to the role list.
- Click Save
Add additional roles to main role.
- Navigate to Organization > Users, select VMware CBC Admin
- Once the record is open, scroll down and go to the Roles section, select main role (x_vmw_cb_connector.admin)
- Under contains role, select Edit, add additional roles by moving the relevant collection to the contains roles list.

Additional roles vary depending on whether you are configuring ITSM or SecOps.
Rerun the above steps to create another user, VMware CBC Analyst, with the relevant roles.
ServiceNOW App Configuration
Now that the APIs and User roles have been configured, you are ready to configure the integration app itself, the instructions to configure the ITSM or SecOps apps are the same.
We will be using default settings in the configuration profile to configure the apps in this guide. A configuration profile is used to set up the integration and holds all the configuration for the integration app. This is where we set the credentials, configure the data sync and set up how incidents are created in ServiceNow. If customisation is required, please refer to the user guides.
To create a configuration profile,
- Navigate to VMware Carbon Black Cloud > Configurations.
- Click on the “New” button to create a Configuration Profile.
Under the configuration tab, we specify the integration app we are using, we set up the API keys and configure the alert ingestion.
- Select “Carbon Black Cloud - ServiceNow ITSM Integration” from the “Select Integration to Create Incidents” dropdown.
- Enter a unique “Name”, “Order”, and “Description” in the Overview section.
- Enter a valid “Base URL”, “Org Key”, “API ID”, and “API Secret Key” in the Credentials section. These values are provided by Carbon Black Cloud.
- For Alert Ingestion Approach, choose REST API.

- Click next
Under the Alert Filtering tab, we choose the type and minimum severity of the alerts we want to ingest into ServiceNow.
- Click on Alert Filtering.
- Uncheck any alert types you do not want to ingest from Carbon Black Cloud.
- Select the Minimum severity from 1-10. By default the value is 3 for each Alert type.

The Incident Creation tab is used to set conditions for when Carbon Black Cloud alerts should generate ServiceNow Incidents in an automated way. If you do not want to create incident creation criteria, skip the step by clicking Next.
- Click on Incident Creation.
- Click on the Apply Defaults button to get a suggested default value for Incident creation and Alert Aggregation. Check the default values to verify the setting.
- Click next.
An automatic incident will be created only if the Apply Incident Creation checkbox has been checked and the condition given in the Incident Creation field has been satisfied.

Field Mapping is used to map Carbon Black Cloud alert fields with ServiceNow fields.
- Click on Field Mapping.
- Click the “Apply Defaults” button to get suggestions for data mapping. Check the default values to verify that the settings are what you desire for Field Mapping.
- Click next.

The Scheduling tab used to control when or how often data is collected from Carbon Black Cloud. There are two settings that can be configured: Recurring Data Collection and One-Time Data collection.
- Click on Scheduling.
- Check the Recurring data collection checkbox.
- Enter time Interval in seconds.
- Provide the Collection Start time as per the need from the calendar. The Collection Start date must be a future date or within 15 days prior to the current date.
- Provide the Collection Start Time for the window. Only past date/times and current time-(minus)15 are acceptable as options.
- Provide the date/time for the Collection End Time of the window.
- Click the Finish Button.

You now have a configuration profile created.
Please note, only one Configuration Profile per Carbon Black Cloud ORG key can be active at a time, so if you try to make another profile with the same active ORG key, a message will appear to inform you that the profile was not activated.
Summary and Additional Resources
Additional Resources
For more information, check out the resources below:
- Installation, Configuration and User Guides on Developer Network
- ServiceNow App store
- Troubleshooting guide
- Use the Developer Community Forum to discuss issues and get answers from other API developers in the Carbon Black Community.
- Report bugs and change requests to Carbon Black Support.
- View all API and integration offerings on the Developer Network along with reference documentation, video tutorials, and how-to guides.
Changelog
The following updates were made to this guide:
| Date | Description of Changes |
| 2022/07/07 |
|
About the Author and Contributors
Raj Sahota has over 15 years of consulting experience in Cyber Security. In addition to all the experience gained while working for 5 years at VMware for the SBU, Raj has vast experience in multiple security disciplines which has been gained while working at the two biggest resellers in the UK.
- Raj Sahota, Senior Technical Marketing Architect, Network and Advanced Security Business Group, VMware
Feedback
Your feedback is valuable.
To comment on this paper, contact VMware Carbon Black Technical Marketing techzone-sbu@vmware.com.