
Getting Started with VMware Carbon Black App Control
Introduction
The purpose of this guide is to get you up and running with VMware Carbon Black App Control in less than an hour. It assumes your App Control server is ready to go, and you have access to the console and can deploy agents onto the operating systems you want to cover. As you’re going to discover, App Control is very rich in capabilities and robust in its power to prevent unwanted execution and change, yet low touch and easy to manage. It makes application control something possible to do across an entire enterprise, without as much work as it would take using other solutions.
Successfully implementing application control in your environment is perhaps the most powerful step you can take to prevent attacks on endpoints, because it enforces the positive security model, which is only allowing trusted files to run, and trusted to change to occur.
System Configuration
Global Password
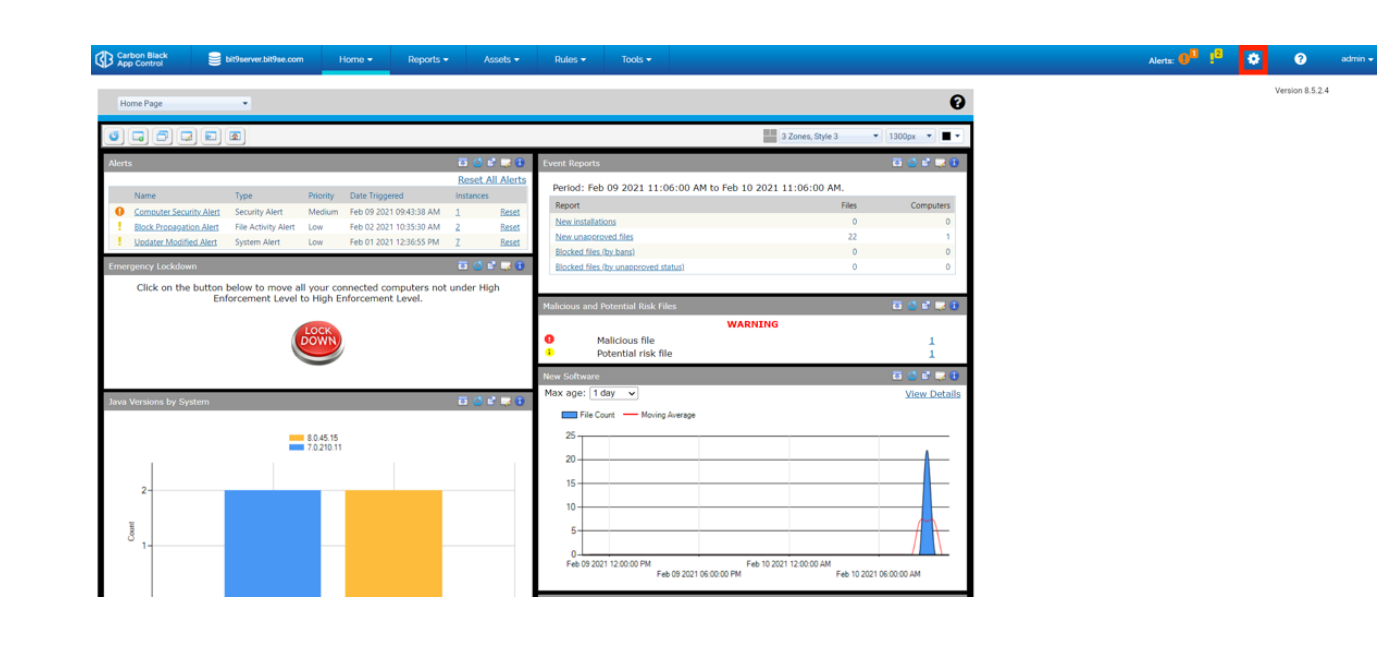
The first thing we want to do in App Control ensures it is optimally configured. This will be quick and easy. Let’s get started by configuring the global password for your App Control agents. This is needed in case you ever need to uninstall an agent, and it enables an emergency tamper protection override. The default password is “control,” but the best practice is to replace that right away. To do this, we need to navigate to Cog Wheel (red box) > System Configuration > General > Edit.
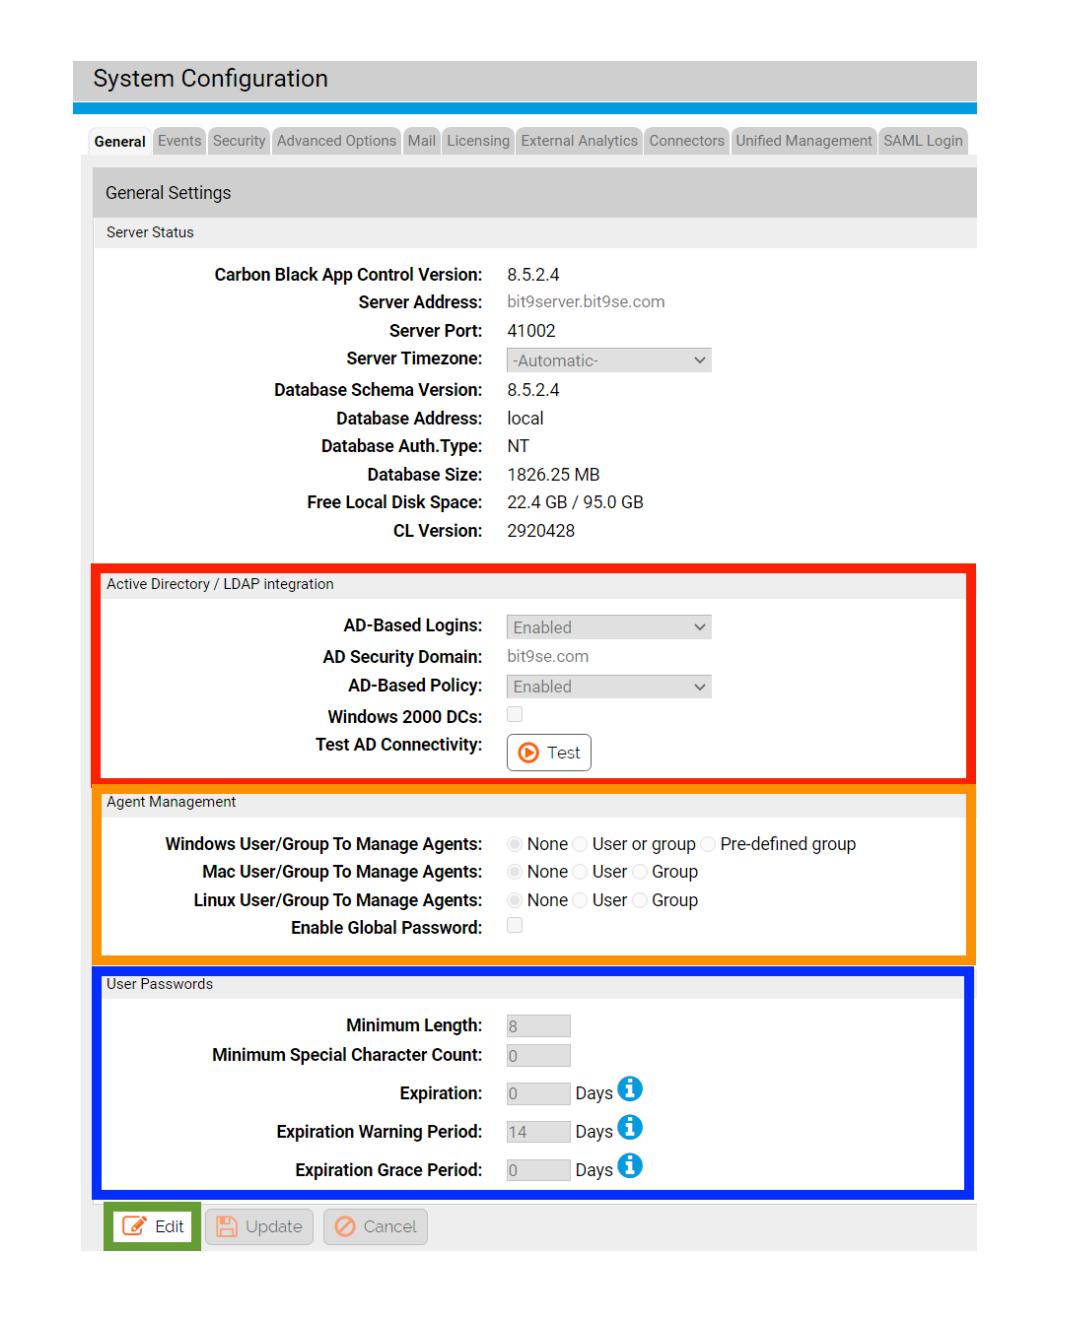
The Edit button will be at the bottom of the General tab page (green box), and what we want to edit is the Global Password in the Agent Management section (orange box). Please note the Active Directory/LDAP integration section (red box). This is where you would be able to swiftly configure AD/LDAP mapping in your production environment. Additionally, you can enforce your organization’s password policy for your App Control administrators (blue box).
Licensing
Next, it is important to ensure licensing is taken care of. Navigate to Cog Wheel > System Configuration > Licensing. Let’s input your SRS (software reputation services) key. This will drastically enrich the data within the console, as it leverages an aggregation of over one billion unique binaries we have seen over time and assigned trust score ratings to. This will allow you to verify the “good” software that currently exists in your environment, as well as identify files that VMware knows are malicious in your environment. You should have received your SRS key in an automated email sent out by your VMware Carbon Black Solution Engineer. Paste your SRS key into the Carbon Black File Reputation section (blue box), and accept the prompts.
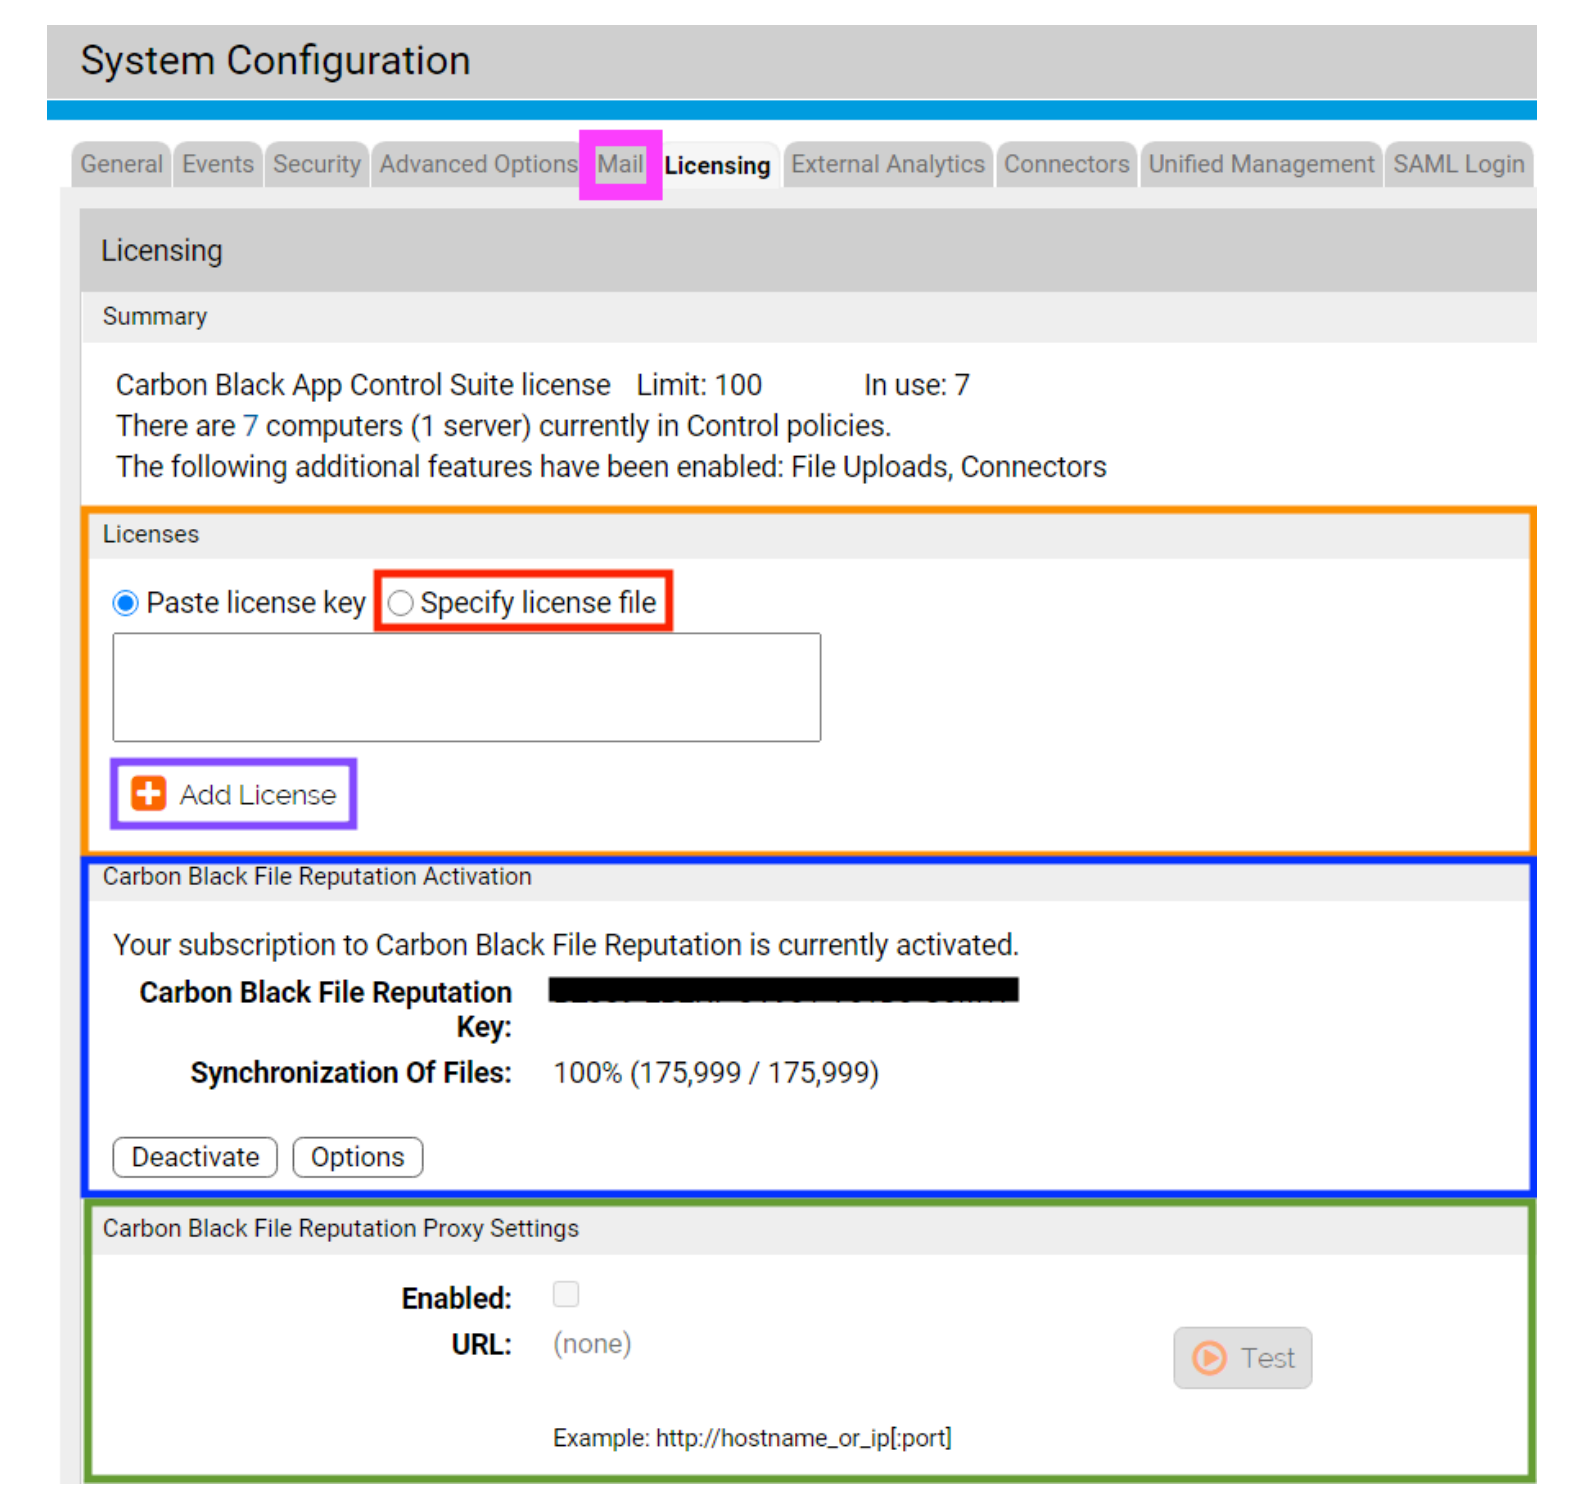
Now, we are going to input your license file, which was also attached to the automated email coming from your VMware Carbon Black Solution Engineer. You can paste the contents of the “.lic” file into the Licenses section (orange box in screenshot above), or put the “.lic” file on your App Control server, select “Specify license file” (red box in screenshot above) and select your license file. Regardless of your preferred method, once this is complete, click “Add License” (purple box in screenshot above). This is also where you would input proxy server information for connectivity to VMware Carbon Black reputation services, if it is needed in your organization (green box in screenshot above). Next up, we will configure email notifications, so mosey on over to the “Mail” tab just to the left of the licensing tab (pink box in the screenshot above).
Email Notifications
The Mail tab is very straightforward. Select “Edit” (purple box), enter your mail server, port, and the “from” address you wish to use (red box), and save your changes. Finally, enter your email to test email notifications (green box).

Alerts
As with any security solution, it’s necessary to ensure optimal prioritization of alerts. So, let’s do that for App Control. Navigate to [Tools (red box) > Alerts]. Within the blue box you can see two icons – one that looks like a notepad (left icon), and the other with paper and a pen (right icon). The notepad allows you to see prior detections for a given alert type, and the paper and pen button allows you to edit an alert. Alerts are highly customizable. You will notice that essentially everything in App Control is quite granularly customizable, which is the result of the product being very mature, having been on the market since 2002, and having incorporated literally thousands of customer requests into the product over time. You can determine how and to whom an alert would be received, and much more. For a POC, it is recommended to enable “malicious file detected” and set it to high. It is also recommended to move Indicator Set Alerts to high, as Indicator Sets are strong indicators of malicious activity.

Detecting Advanced Attacks
Let’s take a look at those aforementioned indicator sets. To get there, navigate to [Rules > Indicator Sets]. Indicator Sets are pre-built by our experienced in-house staff and are aimed at detecting advanced attacks, such as process injection attacks, strange application behavior, process hollowing, and various other methods, which you can see in the screenshot below. Enable all indicator sets by checking off the top box (red box), selecting the Action button (green box), and clicking on “Enable Indicator Set.”

Policies
Policies are where we can define different user groups, which allows you to apply different rules to various policy groupings. Different application requirements dictate the need for different policies. You can have as many policy groups as you need, and they can be mapped to Active Directory/LDAP groups and accounts as well. Navigate to [Rules > Policies > +Add Policy]. What we’re going to do now is create four initial policies, to get us started. They are:
- Deployment (Disabled)
- Learning Mode (Low Enforcement)
- Block and Prompt (Medium Enforcement)
- Default-Deny (High Enforcement – VMware Carbon Black App Control is an approved, PCI-compliant antivirus solution in this policy)To make the Deployment policy, simply type “Deployment” into Policy Name (blue box), select “Disabled” under Mode (green box) and click “Save & Exit” (purple box).
To make the Learning Mode policy, type “Learning Mode into Policy Name (blue box), select “Control” under Mode (orange box), select “Low Enforcement” for both connected and disconnected machines under “Enforcement Level” (red box), select “Allow Upgrades” (pink box) and Save & Exit (purple box).
To make the Block and Prompt policy, follow the same steps as creating the Learning Mode Policy, except select “Medium” under “Enforcement Level” (red box).
To make the Default-Deny policy, follow the same steps as creating the Learning Mode Policy, except select “High” under “Enforcement Level” (red box).

It is best practice to ensure you only push out agents in
Deploying an Agent
To download an agent package, navigate to [Rules > Policies] and select your installer download link (red box). Remember to download the installer for the “Disabled” policy.

Once you have downloaded and installed the App Control agent on your App Control server, you should see it under [Assets > Computers]. Select your App Control server by checking off the box next to it (green box). Then select “Action” (orange box) and move your App Control server from

At this point, two things will happen. Firstly, App Control will start its initialization crawl and inventory all files, applications, certificates and removable devices with storage capacity on or attached to your App Control server. Secondly, tamper prevention will kick in immediately. Finally, App Control can apply custom rules, such as ransomware prevention, if it’s enabled under Rapid Configs, which is beyond the scope of this workshop, but worth noting. You can see the progress of your initialization crawl. Let’s add some additional fields to our Computers view so we can do so across the board going forward.
Device Status
To modify what information you are viewing on the Computers page, select “Show Columns” (red box). We want to ensure we can see % Initialized, % Synchronized, and Policy Status, which are under the “Available” items (blue box). Move over the items we need into the “Selected” items list by using the rightward arrow (orange box). Once you’re all set, click “Apply” (green box). If you like your new view, save it permanently by giving it a name and clicking “Add” (purple box).

% Initialized shows what percentage of files have been inventoried from a given endpoint and sent to your App Control server. % Synchronized lets you know what percentage of files from a given endpoint have been checked against VMware Carbon Black threat intelligence using software reputation services. Our reputation services are optional, many organizations use App Control in completely air-gapped environments, but if your environment is not air-gapped you might as well make use of the services. It can identify known malware leveraging dozens of antivirus engines even beyond VMware Carbon Black’s own ban list, let you know how trustworthy certain files are, and you can auto-approve files based on reputation if desired. Finally, Policy Status shows us if an endpoint has the most up to date rules for the policy group it is a part of.
Events
App Control provides significant visibility into what is occurring on your machines. To see what App Control is recording, navigate to [Reports > Events]. The list is in reverse-chronological order. This useful data can be quickly sorted through by leveraging different columns and filters and saved for future reference, allowing you to quickly sort through different logs for pertinent information. Get started by taking a look at new unapproved files on your current devices by selecting them from your current, default saved views in the drop-down menu (blue box).

Conclusion
Successfully applying application control is very likely the most powerful thing you can do as far as endpoint security goes. Properly-configured application control is the closest you can get to perfect prevention, although no prevention tool can be 100% perfect 100% of the time. Applying application control successfully with VMware Carbon Black App Control is all about defining commonality, and defining vectors of trusted change. For example, software deployed by your deployment solutions should be auto-approved, and App Control can do that. You should also be able to approve software based on publisher, certificate and more. App Control is a robust tool with a ton of capabilities, because we understand what other capabilities are a necessity for application control to be successful, having been doing this since 2002. Application control needs device control, file integrity control and monitoring, behavioral prevention abilities, in-memory rules, and more, to scale to an enterprise level. App Control ensures that everything needed for success is in one product, spanning Windows, Linux and macOS operating systems, including many embedded and IoT editions.